RV Awning Repair
Special note:
This step by step guide contains instructions for the A&E awning. Other brands are similar and all precautions apply.
There is considerable stored energy in the springs that can cause serious
injury - if you are not completely sure of your abilities DO NOT attempt to repair
the awning. Most RVawning repairs are best left to a competent RV technician!
The content of this webpage is for informational purposes only. I wish to stress again that when attempting RV
awning repair the spring pressure must be controlled at all times.
Awning removal
Release the travel locks on the awning arms and position the cam lock to the roll down setting. Roll the awning out about a foot or so. If the cam lock mechanism is not working, you will have to prop the awning in this position with a short board.
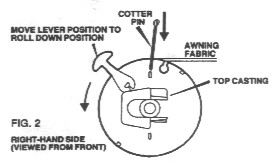
At both end caps, there is a hole through which a cotter pin is inserted to lock the spring tension. The inner shaft must be rotated until the holes line up, insert the cotter pin and bend the ends to prevent it from slipping out.
Remove the two lag bolts that hold each of the rafters to the top of the trailer.
Remove the screw at each side of the awning fabric that holds the fabric in position on the awning rail. The complete awning is now ready to remove from the coach. Have two sawhorses setup at the proper distance apart to place the awning on. The awning rail must not be crimped or flattened out or the awning cord will not slide out. There is a special tool to straighten the awning rail if this is the case.
With a helper, grasp the awning arms, release the arms from the foot that is attached at the bottom of the arm and walk the whole assembly off the end of the trailer until the fabric is completely out of the awning rail. Lay the awning tube on the sawhorses and rest the bottom of the awning arms on the ground.
Releasing the spring tension
Caution: care must be taken to control the spring tension at all times. Considerable force is stored in the spring and this force is easily able to break a wrist or inflict a severe cut.
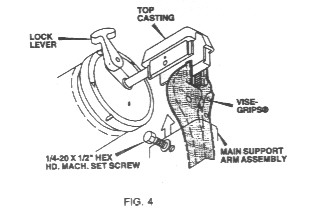
A pair of adequately sized vice grips are clamped onto the removable top part of the awning arm. To prevent scratching the finish, insert cut pieces of rubber inner tube or other similar material, between the jaws of the vice grips before clamping. Be sure to have a firm hold with the vice grips and be sure to have a firm hold on the tool itself. It is best to straddle the awning tube and use both hands to control the vice grips. Have your helper remove the 7/16" bolt holding this part to the awning arm and to then move the awning arm away. Next remove the cotter pin that was previously placed and unwind the spring until all tension is removed.
If the awning fabric is to be removed, repeat this procedure on the other end of the awning to remove that torsion assembly.
Removing the torsion assembly
The torsion assembly consists of the spring, end cap and cam lock mechanism. It is held on to the awning tube by two rivets that must be drilled out. First mark the position of the cam handle on the awning tube so that you can replace it in the same position. Using a 1/8" drill bit, drill out the rivets and remove the end cap/torsion assembly.
Replacing the cam lock/end cap
The end cap (with the cam lock mechanism) is attached to the torsion shaft with pins that must be driven out to replace the cap. Drive out the pin with a hammer and punch and replace the cap with the new one. Reinsert the pins.
Removing the awning fabric
Both torsion assemblies must be removed to be able to slide the fabric off the awning tube. See Removing the torsion assembly section for instructions. Lift the awning tube at both ends and manually unroll the fabric by turning the awning tube by hand until the fabric is fully rolled off. Be sure to mark the awning tube so that the replacement fabric can be inserted into the same position. Slide the fabric off the tube. It is often easier to hold the fabric itself and have a helper or two to slip the awning tube off and away.
Replacing the awning fabric
If you are replacing the awning fabric with a new one, it helps to lay out the old fabric in such a way as to protect the new one from damage as you "thread" it on to the awning tube. A few helping hands are required and some patience is involved. Take care not to rip the fabric as you are sliding it into the awning tube. If you carefully file down the sharp edges on the tube this will help considerably. Once the fabric is in place make sure it is centered on the tube and tuck the cord ends into the tube.
Re-installing the torsion assembly
Install the torsion assembly and line it up with the marks that you made when disassembling it. Rivet the assembly in place.
Re-tensioning the spring
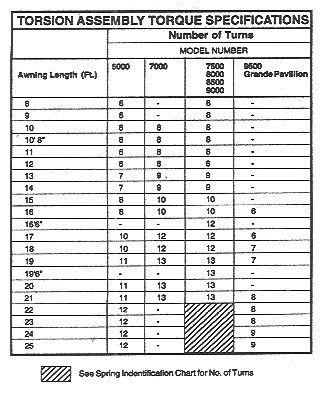
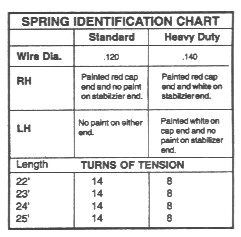
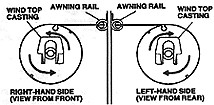
Grasp the end piece with vice grips and have your helper be ready to re-insert the cotter pin. Wind the spring by the number of turns indicated for your model, in the direction indicated on the end cap. Insert the cotter pin to hold the spring tension. Replace the awning arm on the end piece and replace the bolt.
Re-installing the awning
Sometimes it helps to have three people when replacing the awning on the coach - two to handle the awning arms while one to feed the awning cord into the awning rail. While the awning fabric is fairly robust, care must be taken not to snag it on the awning rail. The end of the awning rail can be spread out slightly with a screwdriver and the sharp ends filed down to prevent tearing of the fabric.
Question:
The mounting screws for the awning are rusted off and the area where they screw in to seems rotten. Anybody have any ideas on how to fix ? Thanx JK
Answer: (by David Worley)
Basically, and you may chose to modify it a little, is to drill out the holes large enough to find good, clean wood all around. In your case, maybe 1", maybe 1 1/4", maybe larger. Then, take a length of dowel rod as long as the frame is thick, put some grooves in it to help the glue hold, and glue the dowels in the hole with some quality waterproof glue. After it sets up, drill new holes for your new mounting screws (original size), and you're all set.
Now, in your case, I don't know if you want to drill through the siding with that large of a hole. You may want to pull the siding back if you can. It's up to you. In any case, when installing the new bolts, seal the area with silicone. As I said, you may want to modify it to suit your needs, but you get the general idea.
Good luck, and let us know how it works out for you.
DW
See also: